Description
ProCycle TM40 Installation Guide
You finally purchased a TM40 carburetor for your DR650, or are at least thinking about doing it. Congratulations! So, for the next few minutes I beg you to forget that I work at ProCycle. Never heard of the place. I am just a regular Joe that ordered this carb from the web site.
Told them I had a modified airbox with an aftermarket filter and the stock exhaust. Yeah, stock exhaust. I really like the quiet factor so I can just about ride past the wildlife in the woods without spooking them.
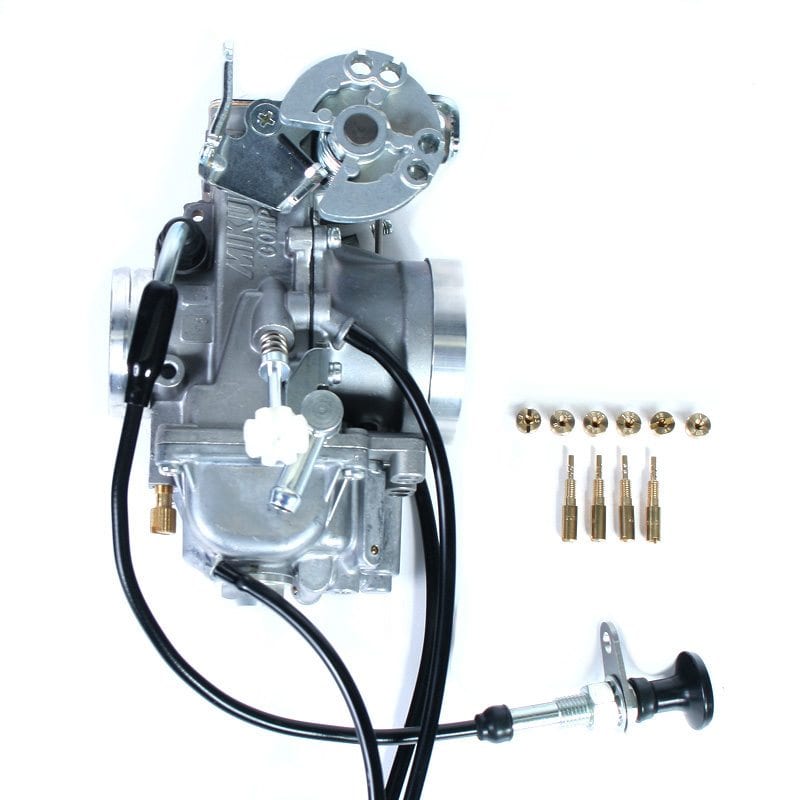
When my order arrived it was all there in one box; a new set of throttle cables (shorter inner cables than stock), a baggie full of jets and a complete instruction packet.
Being your average male, I dove into the project without first reviewing the instructions. Hey, I know how to work on a motorcycle, what can they tell me? I started by pulling out the old carb and cables. I mean, you have to do that to install a new one, right? Along with the carb came the secondary filter and the bar mounted choke lever. That pretty much did it for the removal process.
Before starting the actual installation I decided that a quick peek at the instructions wouldn’t be a bad thing. I mean, hey, these folks have done it a time or two so maybe they know something that I don’t. Besides, I get a nasty look from the boss when I ask a question that is right there in the instructions! Well, good thing I did as there were a couple of important steps that I may have skipped over had I just plowed forward pushing and shoving the new TM into place. The first good tip was to remove the rear brake reservoir from the frame. This allowed me space to get my monkey paws in to finagle the new TM into place from the right side of the motorcycle. This was a good call. That extra room really is important. You can remove this little plastic reservoir now like they recommend, or call them up later and order a new one as you will probably break it off somewhere during the installation process.
Next they told me to trim the two little centering tabs off the rubber portion of the intake manifold. The TM40 doesn’t have anything there to use those and it really needs the room. OK, so another good point taken. I would have struggled for awhile and then cut them off anyway, but this saved a bit of a struggle. A little bit anyway.
The next step in the instructions recommended spraying a bit of WD40 (or some other lubricant) in the two rubber boots that the carb slides into. Again, good advice. The TM40 is just a bit longer (or wider) from intake to exhaust than the stocker (stock is 98.13 mm, TM40 is 105.10 mm) and a bit of lubricant goes a long way in making it easier to squeeze the TM into that smaller space. This is the toughest part of the installation. In fact it is the only thing that is tough. The rest of the job is quite easy, but squeezing the TM40 into the airbox boot can take a few minutes. I found the easiest thing to do was remove the rear clamp, lubricate each boot and start by sliding the front all the way in as far as possible. Once the front is in, wiggle and move the rear part of the carb around and GENTLY work the boot outside the carb with a small screwdriver. Note the word GENTLY! DO NOT put a hole in your boot, that would be a bad thing!
Once you have the airbox boot around the carb, you can put the clamp back on. Be sure you get the clamp all the way around the carb so you have a good seal. Tighten the front and rear clamps good and snug and viola! Your new TM40 installation is just about complete!
So you have the new throttle cables routed correctly, all the slack removed from them and tightened down at the carb as well as at the adjuster. Adjust the cable free-play to a minimum and make sure the throttle will snap closed by itself at the left and right steering lock positions. This is very important! Imagine if you will, a rider, on a motorcycle, making a tight turn and suddenly his mis-routed throttle cables tug the linkage open causing him to launch out in front of a passing beer truck. Is that heaven or hell? You decide.
Let’s finish up the final few steps and button up the entire program: connect the fuel valve vacuum hose to the vacuum port on the front right hand side of the TM, then connect the vacuum hose to the fuel petcock (if you have the stock petcock); replace the rear brake reservoir, fuel tank, seat and side panels.
Now let us commence the start-up procedure: turn the petcock to ‘PRIME’ (if you are using the stock Suzuki petcock, or ‘ON’ if using a non-vacuum petcock); pull the choke knob out (if you used the TM40 knob) or pull the stock bar lever back, and hit that starter button! (Allow me just a moment to say that if you have an oversize IMS tank like I do, reaching that choke knob is now a like reaching behind the work bench for that bolt you just dropped and really need. It is not fun. Thankfully they have a remote choke cable kit that turns it back into a snap. Takes just a few minutes to install and you will be happy you did.)
It took my DR about 3 seconds to start for the first time with the TM. Just thumped right to life and was ready to go! It now requires the choke for about 15 – 30 seconds, even when cold, and is ready to motor away. You will probably have to adjust the idle once it warms up, but with that big knob poking out the left side of the carb, that is no problem.
With the bike warmed up, put on your helmet, jacket and gloves and go for a test ride. Be prepared though! This is no longer your old DR. This is the bike you have always wanted. Remember, I am NOT writing this as a ProCycle employee. I installed this carb on my bike just last night (October 5, 2011) and the difference was AMAZING! This became the motorcycle I thought it would be when I bought it. It now pulls from way down low (where the CV carb would not allow it) clear to the top. There is no hesitation, no stuttering going down the freeway, just nice smooth power everywhere!
Oh, you like to wheelie? They used to be kind of tough with the stock carbie right? Well, not any more! Now you can raise that front end merely with the twist of the wrist.
When you can get the huge smile off your face, take a few minutes and adjust the idle mixture screw. Once you have fully warmed the bike up, turn the idle mixture screw inwards (clockwise) until the idle speed starts to drop or it becomes slightly rough. Then screw the screw out (counter-clockwise) until the idle just smooths out. You have just found the happy spot!
OK, now I work for ProCycle again. Got my shop hat on and just want to finish with a small disclaimer: All motorcycles were not created equal. Each motorcycle is slightly different than the next and jetting that works on one motorcycle may be slightly off on another. The same is the case with the TM40. Though we do our best to get the jetting just right for your bike, it may need some slight adjustments to make it absolutely perfect on your motorcycle. Included with each TM40 is a copy of the tuning manual that will cover exactly how to make changes in detail.


Sheridan Cowling (verified owner) –
This is the 2nd one of these I’ve fitted but first to a bike I own.
It fit up just like the last one (easily) and was easy to set up. I left the jetting as it was as I am running a slip on exhaust and ground down the weld in the header pipe.
My kit didn’t come with instructions for cutting the airbox like the first one I did nor did it come with extra jets but I had a picture of the first one I did and don’t require different jets.
These are very nice upgrade over the stock unit and make a world of difference.
With one of these and a pipe you can run in 3rd gear from 40-90km/h with ease and no hesitation. Great amount of power it gives and perfectly matched to the stock gearing for the stuff I ride.